If a project continues for a longer duration, it is likely that the cost of various resources will change. It can increase, or in certain exceptional cases, may decrease too. While you can refer to the Detailed tutorial on adding resources and their cost in MS Project, in this post we will focus what to do if the rate of a resource changes mid-way. The good news is, you can easily handle resource rate variation in MS Project. We will see that step-by-step with a practical example in this tutorial.
Table of Content
- Including the New Rates of Resources Must Not Affect the Whole Project
- Practical Example of Resource Rate Variation
- Step-by-Step incorporation of the Rates of the Resources in the Schedule
- Conclusion
You can assign rates of any resources, materials, labor, or any fixed overhead for a specific period of time. This is specifically helpful if the project duration is long, or the project uses resources whose rates vary over period of time. With this, you can handle materials whose cost is fluctuating over time, or even a sudden increase or decrease of cost of any particular resource.
The example is true for all the versions of Microsoft Project, it will run in Microsoft Project 2010, 2013, 2016, and Microsoft Project 2019 as well.
Including the New Rates of Resources Must Not Affect the Whole Project
This is what we want. If the rate of a resource increases or decreases, and we include it in our schedule, it should not affect the project for the entire period. Rather, it must only be effective from the date from which the rate is actually increased. MS Project has this feature in it. This optimization of resource rates is important to predict a more accurate cost of a project.
Practical Example of Resource Rate Variation in MS Project
Let’s take a practical example of a reinforcement steel fixing item of work. We will consider the following three resources to understand the process step-by-step:
- TMT Bars (Material)
- Labor for fixing steel (Labor)
- Engineer (Overhead)
The price of TMT bars are fluctuating in nature. The price varies every month, either increase or decrease. Similarly, the minimum wages of labors are also dependent on the Govt. policies and controls the labor cost of the projects. Engineers’ salary changes, generally, once a year.
Let us consider the following table for rate variation of the resources which we will incorporate in our schedule.
TMT Steel Rates:
- Rate from 1st February 2023 is INR 60000
- Rate from 1st March 2023 is INR 65000
- Rate from 1st April is INR 63500
Labour daily wages:
- Wages INR 600/day from 1st February
- Wages revised to INR 650/day from 1st April
Project Manager’s salary:
- Present salary (from project start date) INR 1,00,000/month
- Salary increased to INR 1,20,000/month from 1st April 2023
Travel Cost:
- Travel cost for the project is INR 15000.
Now we will incorporate the above rate variations in the schedule. Let us first create the schedule.
Step-by-Step incorporation of the Resource Rate Variation in the Schedule
Follow the exact steps given below for handling the resource rate variation in Microsoft Project.
Step-1: Now we will prepare a little, one-task schedule to understand the process in detail.

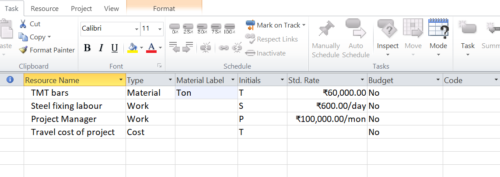
Step-2: Go to the Gantt Chart -> Resource Sheet and enter the required resources for this schedule.

Step-3: Add the Resource Rates as applicable. We have entered four resources, i.e. TMT bars, Steel fixing labours, Project Manager, and Travel Cost. Also, we have entered approximate cost of the first 3 resources,. The fourth resource Travel Cost being of ‘Cost’ type, and we can enter the cost from the Resource Usage sheet. For detailed procedure, Here is how to enter the cost of a resource in detail.
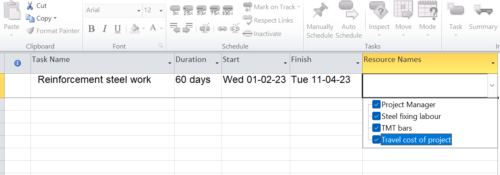
Step-4: Now we will go back to the Gantt Chart view and assign the resources to the task.
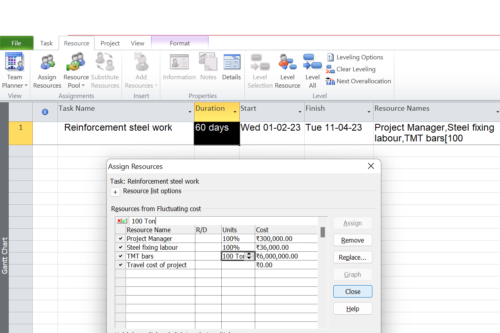
Step-5: We will click on Resources tab from the top ribbon and click on the Assign Resource. Then we will set the quantities.
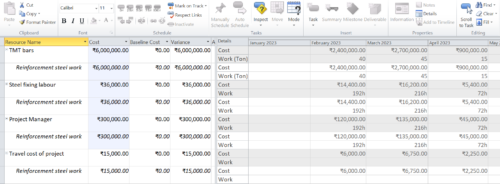
Step-6: Now if we go to Resource Usage we will get the month-wise cost distribution as given below:
Step-7: Again we will move to the Resource Sheet and will double-click on the resources one-by-one. A pop-up will appear like below. Then we will click on the ‘Cost’ tab.
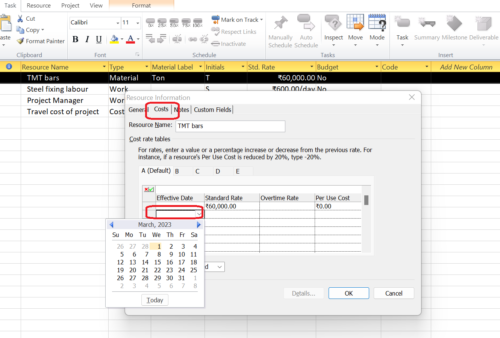
Here, the rate already assigned to the resource will appear in the first line. To add the variations, we will click on the Effective date in the 2nd line and select the dates as we wish to. We will put the rate of the particular resource in the column standard rate and press OK. We can change the per use cost also in the respective column.
For the Steel rates as per our projection, it will look like below after we have completed the entry:
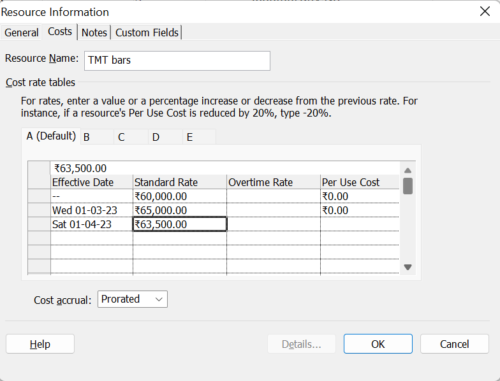
Similar way, we can change the projected rates of Labour and Project Manager also.
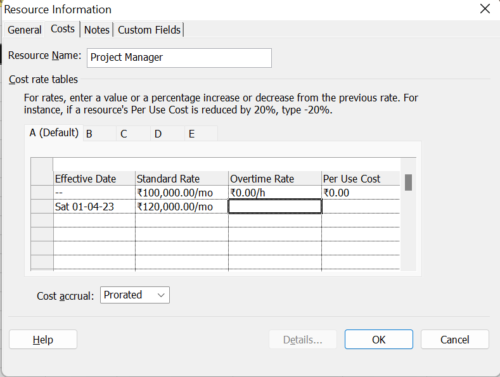
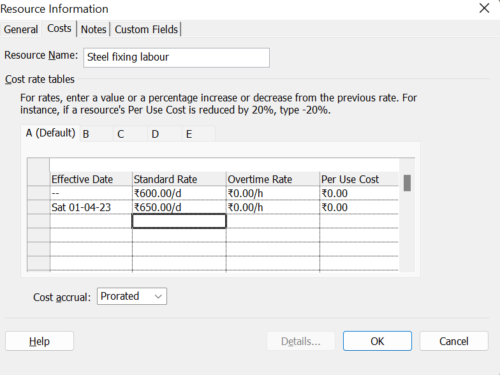
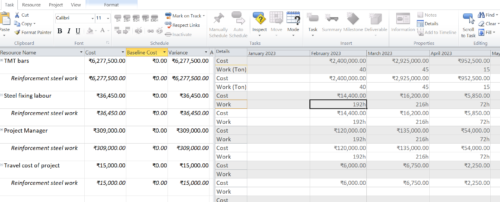
Step-9: Now, to check how the above process has affected our cost projection, we will go to Resource Usage.
Conclusion
Here we see that the month-wise cost of the resources which we have changed in the previous steps are showing the revised cost. And, the costs are different month-wise, just as we entered in the Step-7. The projection is different from what we have seen in Step-6.
So, this way we can control the cost entry of resources in MS project more effectively and provide the projection of the cost more accurately.
If you have any query regarding the above process, you may ask in the comment box.

Hi there would you mind letting me know which hosting company you’re utilizing? I’ve loaded your blog in 3 different web browsers and I must say this blog loads a lot quicker then most. Can you recommend a good internet hosting provider at a honest price? Many thanks, I appreciate it!
Your house is valueble for me. Thanks!…